I know you’ve been meaning to, but you’ve been distracted or busy or haven’t known where to start. I get it. I’ve been thinking of you and all the well-meaning busy people who have wanted to incorporate green cleaning methods into their home care, but for one reason or another, haven’t. This challenge is for you.
I’ve written this “Green Cleaning Challenge Checklist” to make it easy to launch your journey into green cleaning by changing one routine at a time. After 4 weeks, you’ll have a low-tox kit and the know-how to clean your home, top-to-bottom with effective cleaners that are easy to remember. This challenge will take you from completely conventional to deeply green, guiding you through replacing your conventional cleaning products with more natural cleaning alternatives. By the end, you’ll have created a robust DIY non-toxic cleaning arsenal.
Table of contents:
- What is green cleaning?
- What are the benefits of green cleaning?
- Why make your own cleaners?
- How is GIY different from DIY?
- Your Green Cleaning Starter Kit
- How to take that first step into green cleaning
- How to use the Challenge Checklist
- The Green Cleaning Challenge Checklist
- How to dispose of conventional cleaners safely
- What is the shelf life of homemade cleaners?
What is green cleaning?
My working definition of “green” is: leave the place better than I found it. Fundamentally, it is about stewardship. To expand on that, whether I’m talking about our homes, bodies, pets, work places, gardens, or the great outdoors, I want to engage with it and care for it in ways that:
- Promote health, especially for the very young, the elderly, and others who are most vulnerable
- Minimize damage, waste, or other problems for future generations
- Are sustainable and renewable
- Are maintainable in the long-term both to our schedules and to our budgets
Focusing more specifically on our homes, green cleaning prioritizes caring for our homes with the least intensive means possible, leaving no residues on surfaces, airborne pollutants, or other problematic side effects.
I take this time to define “green” because the word is bandied about a good bit these days and yet has no regulated definition. So as you read along here and perhaps explore other eco-friendly cleaning tips throughout my website, keep what I mean by green in mind.
What are the benefits of green cleaning?
Consider why we clean. We clean for hygiene —to remove germs, dust, and other particles that might make us sick. We clean for beauty —we want our spaces to look attractive and be pleasant places to occupy, thereby promoting our inner well-being and productivity. We clean for longevity—to keep our spaces in great shape and usable for years to come.
And yet, all of this can be nullified by using the wrong cleaners. In the process of removing germs, conventional cleaners can expose the user and others in the area to allergens endemic in undisclosed “fragrance” compounds, notorious hormone disruptors such as paraben preservatives, and sensitizers such as the formaldehyde-releasing quaternium and urea surfactants and -isothiazolinone preservatives, thereby creating health problems where none previously existed. And it’s not just cleaning with these products. The production and disposal of conventional cleaners that are derived from petrochemicals or are not biodegradable can mar the natural beauty of our world by stripping the landscape and polluting soil, water, and air.
My working definition of “green” is: leave the place better than I found it. Fundamentally, it is about stewardship.
And this is all when the cleaners are used as intended. What happens when things go sideways, when cleaners are misused or get into the wrong hands or paws? The answer is found in the hazard warnings on the labels: “causes irreversible skin damage,” “causes blindness,” “call Poison Control,” “may be fatal.” None of this is necessary for cleaning our houses. The best natural cleaning products can take care of any household issue without risk to anyone’s health or well-being.
What ignited my personal adoption of green cleaning practices was reading the results of a 30 year study that revealed that people who use intensive cleaning products regularly were 32% more likely to develop Chronic Obstructive Pulmonary Disesase (COPD). The two groups of people the study followed were nurses and the primary people who clean a home. That would be me. I did not want my efforts to improve my home to end up making me sick.
Why make your own cleaners?
Homemade cleaning solutions offer a plethora of benefits, not the least of which is safety to the user. When you make your own cleaning solutions, you are in control of what ingredients go into them, you can customize them to meet your exact needs and preferences, you will use far less packaging (another environmental benefit not to be underestimated), and you’ll save money. What’s not to love there?
But why can’t we just go out and buy green cleaners? After all, there are a good many products on the shelves boasting various “green” features. Here’s why: not only does buying pre-made, so-called green cleaners lose the benefit of cost-savings and still use just as much packaging as buying conventional, but because of the lack of any supervision of the word “green,” you won’t even know what you’re getting. There is no guarantee that the product inside the bottle is any safer or more healthful than its conventionally labeled counterpart.
To help me remember the bigger picture of what I’m doing, I started using a term I made up. Instead of thinking I was DIY-ing my own cleaners, I started calling it GIY-ing. GIY means Green-It-Yourself.
How is GIY different from DIY?
GIY is a phrase I use throughout the my Going Green channels when talking about homemade natural cleaning products. GIY is not a typo. While DIY means to Do-It-Yourself, GIY is my little twist, meaning Green-It-Yourself. It’s the same idea of DIY home cleaners but prioritizing non-toxic ingredients. I would be thrilled to bits if it became a commonly used phrase in our cultural lingo.
Your Green Cleaning Starter Kit
To set up your green cleaning starter kit, you’ll need to gather a few materials. Really, there are very few. You might even question me and think, “Don’t I need more than this?” No, that’s another perk of GIY-ing your green cleaners: you save cabinet space because these homemade cleaning solutions are so very versatile.
What you’ll need:
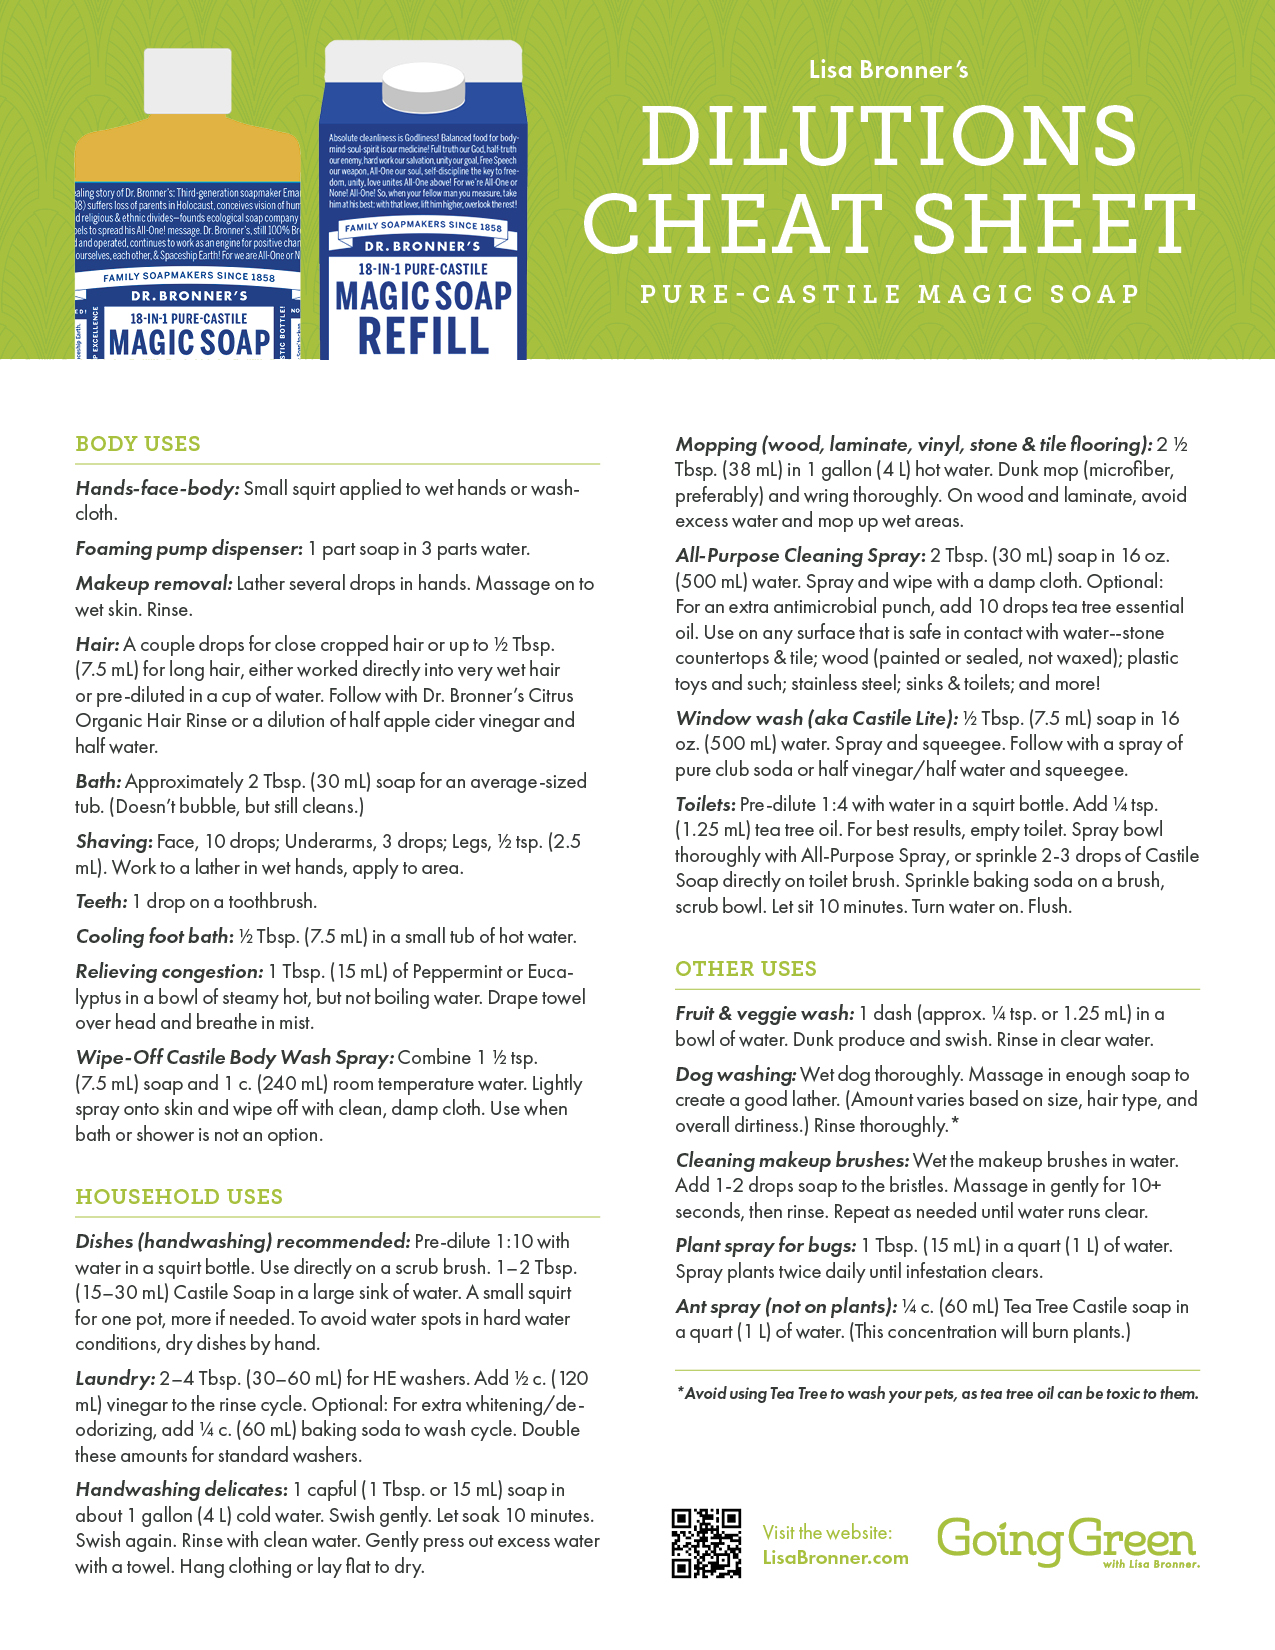
- Dr. Bronner’s Sal Suds Biodegradable Cleaner® & Pure-Castile Liquid Magic Soap®
- Cleaning cloths & quality brushes
- 2-3 Glass or plastic spray bottles
- 32 oz. (1 L) squirt bottle (optional)
- Glass or plastic shaker jar with holes in the lid
- Distilled white vinegar
- Baking soda
- Optional: Essential oils, wool dryer balls, copy of my book Soap & Soul
Dr. Bronner’s Sal Suds vs. Castile Soap – which should you use?
You may have already noticed an “or” in the list between Dr. Bronner’s Sal Suds Biodegradable Cleaner and Dr. Bronner’s Pure-Castile Magic Soap. Here’s the thing: they both are great and are nearly interchangeable. If you have one on hand, go with that one. If you have both on hand, choose whichever is closest. They both are excellent cleaners, are sustainably sourced, are very concentrated, and do a great job at a variety of cleaning tasks.
Both the Castile Magic Soap and the Sal Suds are Dr. Bronner’s products made with ethically sourced ingredients, scented with essential oils, are biodegradable, and are concentrated. Both are surfactants, which means that they clean by removing debris from surfaces, as opposed to a disinfectant which works by killing microbes.
As for differences, Sal Suds is a mild detergent and the Magic Soap is a true soap. This speaks to their formation and molecular structure. True soaps are made very simply by reacting oils with a strong alkali. Detergents have more steps in their fabrication and require synthesis in a laboratory. Another difference is that true soaps are impacted by hard water, reacting with the minerals and can leave a cloudiness on shiny surfaces. Sal Suds, as a detergent, is immune to hard water and is best used for shiny surfaces.
Other than these few specific situations, the products are interchangeable.
Green cleaning tools
One of the many pieces of wisdom my mother taught me is that when you buy quality, you only cry once. This is true for the tools you have in your green cleaning kit. Purchase durable, long-lasting tools, rather than ones that are inexpensive or cute.
Cleaning cloths: These should be washable/reusable cloths that are very absorbent and do not drop lint. I use microfiber cloths, which I buy in bulk packs in the automotive section. Because microfiber can shed particles for the first seven washes, wash them inside a mesh bag designed for this purpose such as the GuppyFriend. I have had my same stash of microfiber cloths for over ten years, using them weekly.
Spray bottles: Again, the priority here is durable and long-term functional. Otherwise, you are generating waste and costing yourself money. I purchase spray bottles from hardware stores. I recommend buying a size whose contents you will use up every few weeks. That’s probably a 16 oz. bottle. This will ensure your solutions are fresh.
My Cheat Sheets: The Challenge Checklist I’m sharing with you will get you started. However, there are a number of less common cleaning scenarios that you will come across that I don’t get into here. You’ll need the cheat sheets that I’ve written that more thoroughly explore the uses and dilutions for the Dr. Bronner’s Magic Soap and the Sal Suds. Keep them handy. I have them posted on the inside of my cleaning cabinet door for easy reference.
My book Soap & Soul: A few years back I wrote my recipes and the science behind them into my book Soap & Soul: A Practical Guide to Minding Your Home, Your Body, and Your Spirit with Dr. Bronner’s Magic Soaps. My goal was to simplify what to do while at the same time understanding why these practices work. If you are at all skeptical about the effectiveness of low-tox cleaning, you are whom I wrote this book for, to grow your confidence in these practices.
Supporting ingredients
While Sal Suds and Magic Soap are the main contenders in the ring against grime, there are a few supporting players amidst your homemade cleaning supplies. Here are some things to know about them:
Vinegar: An important part of your kit, but keep in mind, when it comes to GIY cleaning with vinegar, remember that it is an acid. That means it can corrode metal, etch natural stone, and deteriorate wood. Take care where you use it. It is great on glass, ceramic, and porcelain, and I use it regularly alongside my natural cleaning agents. The vinegar that I discuss in my recipes is standard 4-5% white distilled kitchen vinegar. Cleaning vinegar, which can be as concentrated as 30%, is intensely corrosive and emits fumes that are harmful to breathe. Cleaning vinegar is unnecessary. Just get the kitchen stuff. I buy mine in gallons.
Baking soda: Along with vinegar, the next supporting agent is baking soda. This is the same substance you may be using as leavening in your cookie baking, but I buy it by the bulk bag. It doesn’t expire and is extremely useful for scouring and deodorizing.
Other items I incorporate into my kit are wool dryer balls to use in my laundry dry cycle instead of fabric softeners, and essential oils, which personalize your homemade cleaning solutions and may provide additional cleaning benefit.
What not to mix
Don’t fall into the trap of thinking that just because all these ingredients I’m mentioning are part of a non-toxic cleaning repertoire, that they then can all be mixed together willy-nilly. Chemistry happens. Here are some combos to avoid:
- Soap & vinegar – Or soap and any acid, such as lemon juice or citric acid. Soap is an alkali, aka a base, and vinegar is an acid. They will react with each other and form a gloppy mess. This is not a dangerous reaction, but it is messy and wasteful. It will not clean anything.
- Sal Suds & vinegar – While these two will not cause the same reaction that soap and vinegar will, with Sal Suds being the more resilient detergent and all, my chemist colleagues in Dr. Bronner’s R&D department (my dad was a chemist – I think they’re rockstars) have tested how Sal Suds performs with vinegar. They found that vinegar doesn’t help Sal Suds clean. Vinegar made Sal Suds less effective. So save yourself the extra effort and don’t mix them together.
- Baking soda & vinegar – In most contexts baking soda and vinegar are not a useful cleaning combination. They make a lovely fizz that we all enjoy, but there is no cleaning chemistry produced by their reaction. There is the possibility that all the agitation of molecules during the fizz will bump off grime from a surface, which is why they might help a stinky (but not a clogged) drain, but that’s about it. Definitely do not premix them and leave them in a closed container. Not only will the off-gassing carbon dioxide cause the container to explode, but the remaining liquid is merely water and sodium acetate, which won’t do any more than water and baking soda.
- Vinegar & hydrogen peroxide – Both of these have a place in your green cleaning cabinet, but don’t mix them together. They produce peracetic acid, which requires robust protective gear to handle safely.
While we’re talking about mixtures, I want to mention more dangerous combinations. These mixtures all have one ingredient in common: bleach. Bleach is a highly reactive substance. When combined with ammonia, it produces mustard gas. With vinegar, it forms chlorine gas. With rubbing alcohol, it forms chloroform. And while less dangerous, bleach and Castile soap forms a higher pH, more caustic soap. Never combine bleach with another store-bought cleaning formulation, whose specific ingredients you might not know.
How to take that first step into green cleaning
If this is your first foray into making your own home cleaning recipes, let me encourage you to make one change at a time. This leads to a greater likelihood of long-term success than dumping out your entire cleaning cabinet at once. Trying to switch everything immediately will lead to frustration and expense when you aren’t familiar with what to use instead, and in a flurry of a last-minute cleaning needs, you’ll go out and re-buy what you just threw out. Instead, learn how to make and use your own cleaning supplies one at a time, becoming familiar with what is in them and confident in their effectiveness.
I developed this Green Challenge Checklist to guide you through the transition. It can be overwhelming to do anything for the first time, and if you’ve tried to compile information on green cleaning from a general online search, you’re likely deluged. My hope is that this Checklist is simple and straightforward and will enable your new cleaning regimen to merge smoothly into your household, schedule, and budget.
How to use the Green Cleaning Challenge Checklist
Personally, I’m a hard copy person, which means I would print out this list and post it on the inside of my cleaning cabinet door, or in some other handy spot. However, I also can see the wisdom of bookmarking this page in your browser or downloading to your phone and keeping everything digital and tidy.
Once you have the Checklist in hand, you’ll want to gather your supplies. For some of these items, all that entails is a trip to the kitchen. You may already have one of the Dr. Bronner’s products on hand though you haven’t explored the awesome abundance (I’m a bit biased) of its uses. Perhaps you’ll need to purchase a few things, but I promise these up-front costs will not be repeated for a very long time. If you calculate what you’ve spent after a few months compared to when you were cleaning conventional, you’ll see the savings.
The Green Cleaning Challenge Checklist
And here it is! You’re very own Green Cleaning Challenge Checklist. This challenge, should you choose to accept it, will transition you from conventional to green cleaners, one week at a time. You will be a deep green superstar by the end of a month!

Then, begin the GIY swaps, one at a time. I chose to begin these swaps with the product that I use the most, and I expect you will, too: the GIY All-Purpose Cleaning Spray. One product for counters, sinks, fixtures, tubs, appliances, walls, and generally, all over the house. What you’ll quickly see is that there is no need to have a separate set of bathroom cleaners and kitchen cleaners and living space cleaners and kid space cleaners. Think of the clutter-reduction in your cabinets!
From there, the Checklist guides you through cleaning everything from countertops and appliances, glass and mirrors to dishes, tubs to sinks, and then dishes, laundry, furniture, and flooring. All the things we clean the most around our homes!
How to dispose of conventional cleaners safely
After you make this transition to sustainable cleaning, you will have conventional products you no longer will use. Here are two ideas of what to do with them:
- Find a friend who is not at the same place in their sustainable cleaning journey to give them to. I know this may sound like an unkindness since you and I both know how harmful these cleaners are, but if a person isn’t ready to make the switch to eco friendly cleaning practices, then they’re going to be buying them anyways. This way, you’re saving them money and keeping further packaging out of the waste stream.
- Dispose of them as hazardous waste. The fact that this is the universal recommendation of how to dispose of these household cleaners really speaks to what they are: hazardous. Therefore, you’ll need to look for hazardous waste drop off sites in your area. DO NOT pour these down your drain. That would be truly catastrophic for downstream life if you are on a city sewer system, and if you are on a septic system, as I am, pouring copious amounts of potent cleaners into it will bring its action to a standstill.
What is the shelf life of homemade cleaners?
When you make your own cleaners, the one thing they won’t have is a preservative or anything to guarantee a shelf life as long as their store-bought counterparts. This is a good thing, because many oft-used conventional preservatives, such as parabens (a hormone disruptor) or -isothiazolinones (a common irritant), harbor a host of hazards. Therefore, aim to keep your homemade cleaners for 2-4 weeks and then remake them.
Eventually, you’ll be familiar with how much you use in that time period and make the right amount. I have these handy GIY Labels for your solutions that have the recipes right on them, so that it is super easy to refill them. Store your homemade cleaners in a cool, dark place as light and warmth will speed their degradation. Also, using distilled or reverse-osmosis filtered water will ensure greater longevity.
Frequently asked questions
How is Dr. Bronner’s Sal Suds different from Castile Magic Soap?
Sal Suds is a gentle yet effective detergent and the Castile Magic Soap is a true soap. The Magic Soap is designed first for body cleansing, but has a plethora of uses around the house, too. Sal Suds is designed only for household cleaning, providing superb performance against grease and in hard water.
Which conventional cleaner should I replace first?
The first conventional cleaner to replace is the one you use the most – which for most of us is our all-purpose cleaning spray.
How do I dispose of conventional cleaners?
Either give away conventional cleaners to someone who is still using them or dispose of them at a hazardous waste disposal site.
What is the shelf life of homemade cleaners?
The shelf-life of homemade cleaners is about 2-4 weeks. If you don’t use them up in that amount of time, make up smaller batches moving forward.
Are homemade cleaners as effective as store-bought?
Yes, properly formulated homemade are as effective as store-bought. Follow my recipes and guidance to make them properly.
Are green cleaners safe for pets and kids?
Green cleaners are safer for pets and kids than storebought alternatives. While pets and kids are ingenious at being able to make a mess out of anything, one of the benefits of GIY cleaners is that if they are misused or fall into the wrong hands, they do not pose the same risk as conventional cleaners. Essential oils are often a focus of concern for pet-owners, but the issue is regarding applying full-strength essential oils directly to pets. However, for cleaning in areas they inhabit, the essential oils in the above formulations are extremely diluted and when properly used, do not leave residues that would impact pets in the spaces.
Now is the time to begin your green cleaning challenge
I know it can be difficult to start something new. But you can do this. This is one step at a time and it will become easier and easier. You will end up spending less and less money. You will be living in an environment that is healthier and healthier. And I am here to answer any questions that arise.
In order to encourage others who will come along, please share in the comments your own journey in going green. It is such a help to hear stories of those who have gone before.
Further reading
- 13 Non-Toxic DIY Recipes for Cleaning and Body Care
- Your Guide to Building a Green Cleaning Starter Kit
- How Green Cleaning Can Save You Money
These tips and many more are in my book, Soap & Soul: A Practical Guide to Minding Your Home, Your Body, and Your Spirit with Dr. Bronner’s Magic Soaps, available now in hardback, eBook, and audiobook (read by me!) at your favorite bookseller.